Friday, January 27, 2012

Tip 5 (Week 5 Winter 2012): Scheduling a meeting, vacation, and repeats

There are three easy ways to schedule a new meeting in your calendar.  First, find the time and date that you want to schedule the meeting.  Then, either double click the cell, right click and choose " New Meeting Request," or click and choose "New Meeting" at the top of the screen.


Below is the next screen you'll receive where you'll enter the information for the new meeting.  Subject and Location are both preferred by Outlook and it will remind you should either of these field be missing.  At the top of the screen you'll be able to show yourself as free or busy during that time, and choose how you'd like to be reminded.  


This is also where you can setup a repeating meeting.


Here you're able to choose the days of the week you'd like to repeat, an end date, or an amount of weeks you'd like the meeting to continue.


Lastly, it's preferred that vacations be marked in calendars by the full hours to work that day.  In the example below you'll notice a blocked off 8-5 with the subject of "vacation."  Also, the time is shown as busy.  This should be done for all vacation days.


To complete this task setup a recurring event, or schedule your next day of vacation.

Post Author: Derek Malone & Steve Mowrey


Tip 4 (Week 4 Winter 2012): Calendar Preferences

This post is intended to give a brief overview of some good practices when it comes to calendar preferences.  To have a good view of what your week will consist of, it's probably best to setup your calendar to show your work week.


This view shows Monday-Friday, 8-5 by default, but should you work different hours that can be changed.  By clicking the small arrow in the bottom right corner of the "Arrange" box you're able to open options for your calendar and manipulate them to your liking.


You can change your work week hours here, days, etc.  Unfortunately, it can't be done on a daily basis (i.e. Tuesday 10-7, Wed 8-5, etc.).  But, if you do have differing hours, maybe you could setup 8-7 in that example as your work week.

This box also gives some options for meetings.


You can choose different times for your reminders instead of the default 15 minutes prior, change whether attendees can propose new times to your meetings, and toggle with your free/busy options.

To complete this Tech Tip visit your calendar options and set your work week as you'd like it.  Make sure to check yourself off the list when finished.

Post Authors: Derek Malone & Terri Nelson

Monday, January 16, 2012

Tip 3 (Week 3 Winter 2012): Calendar Permissions

Anyone at Ohio University on Outlook (Exchange server) can view your calender. Don’t panic. They can only see if you are free or busy (not any details about what you are doing or where you might be) because they are viewing your calendar as one of the preloaded users (either default or anonymous). It can be beneficial for certain people (like your supervisor or your colleagues in your department) to see more detailed information about your schedule. You can control the information others see about your appointments and meetings by setting the permission level for the contact (i.e., library staff) and by making appointments and meetings private.

Part A: Adding contacts to your calendar permissions
Let’s start by adding library staff to “calendar permissions” so you can adjust their permission levels (it has been highly recommended that all supervisors have “reviewer” level access to their staff’s calendar).


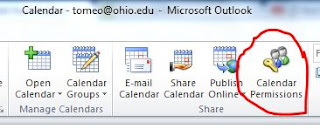
Starting from the calendar view in your Outlook:
  1. Click “Calendar Permissions”
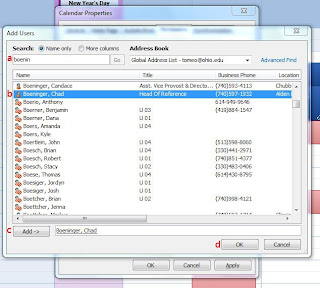
  2. Click “Add...”
  3. Search for the last name of a library staff member (a)
  4. If the name is not already highlighted in blue, click on the name to highlight it (b)
  5. Click “Add->” (c)
  6. Repeat steps 3 to 5 for each staff member you would like to adjust their permission levels
  7. Click “Ok” (d)


Now that everyone is in our list, let’s see how to adjust permission levels for one or more contacts.

Part B: Adjusting the permission level of your contacts
Let’s learn a little about the different permission levels. A warning, never assign anyone the permission level of “owner” as they will have access to everything and can cause havoc.


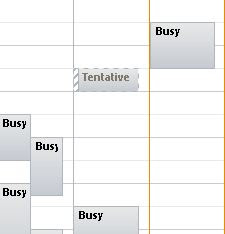
As already mentioned the two preloaded user types, default and anonymous, have a “free/busy time” permission level. When a default or anonymous user, or a person you set to this permission level views your calendar, they see that you are either free or busy.


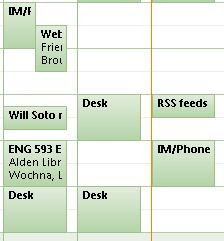
If you adjust the permission level to “free/busy time, subject, location” or “reviewer”, the viewer will see if you are free or busy as well as the details i.e., the subject and location of your appointments and meetings.

There are several more permission levels (contributor, author, editor, and the variations of author and editor). These are beyond the scope of this post because these permission levels give the contact varying ability to create, edit, and/or delete appointments and meetings. Most everyone in the library will just need to be able to read your calendar.


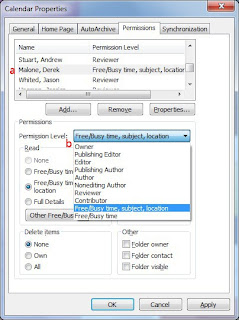
To adjust the permission level:
  1. Select one contact or multiple contacts by using CTRL or Shift (they will be highlighted in blue) (a)
  2. Select the permission level from the pull down menu (b)
  3. Click “Ok”


Part C: Making appointments and meetings private


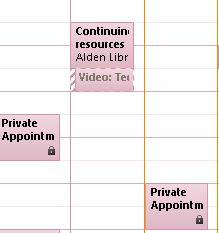
For certain appointments (e.g., doctor’s appointment), you may want everyone, regardless of their permission level, to see that you are busy and nothing else (indicated on your calendar as "private appointment").

To make a meeting or appointment private:
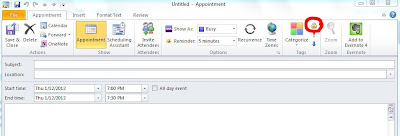
  1. Create the meeting or appointment
  2. Click the lock icon


You can mark the tech tip complete on the Google spreadsheet after you
  • added a library staff member (your supervisor, for example) to calendar permissions,
  • changed the permission level for contact(s), and
  • created a private appointment or meeting.
Post Author: Megan Tomeo

Monday, January 9, 2012

Tip 2 (Week 2 Winter 2012): Calendar Etiquette

Calendar etiquettetechtip
View more presentations from Jessica Hagman

To complete this week's task, watch the PowerPoint and review your calendar practices, then mark yourself off the list.

Post Author: Jessica Hagman

Friday, January 6, 2012

Tip 1 (Week 1 Winter 2012): Calendar Overview & Layout

Welcome back to another exciting round of Tech Tips.  This quarter we're going to incorporate some live interactive sessions in with the Tech Tips format we already have.  We'll still maintain the blog with screen shots and text, but the interactive sessions will allow a question and answer format along with video examples.

Here's a link to where we'll host the video sessions: https://adobeconnect.oit.ohio.edu/techtips/

Now, onto Tech Tip 1 Winter 2012.

This intended to just familiarize everyone with the calendar and highlight some of the tools we'll be using this quarter.  This is going to be pretty basic with the emphasis this week really being on making sure those interested in the video sessions can login and manipulate their workstations as needed.  So, there is nothing needed for completion this week other than reading the blog and checking yourself off the list.

Here are some screen captures of the interface we'll be using this quarter.  Your personal calendar is the majority of the screen.  And, it's display is based or your choice of arrangement at the top.


Please familiarize yourself with the ribbon and its controls.  This, and the calendar itself will be the origin of many activities this quarter.


That's it for this week.  Just wanted to cover what we'll be using.  Please join Monday if you'd like to explore how the live video sessions will run.

Post Author: Derek Malone