Wednesday, May 30, 2012
Website Testing Week 10
Come back on Monday, June 4 at 11 AM for the follow up session. Find out the results, ask questions, and hear a bit more about the website.
Tuesday, May 22, 2012
Website Testing Week 9
Start your tech tip at the library's new website.
Come back on Tuesday, May 29 at 11 AM for the follow up session. Find out the results, ask questions, and hear a bit more about the website.
Come back on Tuesday, May 29 at 11 AM for the follow up session. Find out the results, ask questions, and hear a bit more about the website.
Monday, May 14, 2012
Website Testing Week 8
Start your tech tip at the library's new website.
Come back on Monday, May 21 at 11 AM for the follow up session. Find out the results, ask questions, and hear a bit more about the website.
Come back on Monday, May 21 at 11 AM for the follow up session. Find out the results, ask questions, and hear a bit more about the website.
Thursday, May 10, 2012
Website Testing Week 7
Start your tech tip at the library's new website.
Come back on Monday, May 14 at 11 AM for the follow up session. Find out the results, ask questions, and hear a bit more about the website.
Come back on Monday, May 14 at 11 AM for the follow up session. Find out the results, ask questions, and hear a bit more about the website.
Tuesday, May 1, 2012
Website Testing Week 6
Start your tech tip at the library's new website.
Come back on Tuesday, May 8 at 11 AM for the follow up session. Find out the results, ask questions, and hear a bit more about the website.
Come back on Tuesday, May 8 at 11 AM for the follow up session. Find out the results, ask questions, and hear a bit more about the website.
Wednesday, April 25, 2012
Website Testing Week 5
Start your tech tip at the library's new website.
Come back on Monday, April 30 at 9 AM for the follow up session. Find out the results, ask questions, and hear a bit more about the website.
Come back on Monday, April 30 at 9 AM for the follow up session. Find out the results, ask questions, and hear a bit more about the website.
Monday, April 16, 2012
Tip 4 (Week 4 Spring 2012) Website Testing
Start your tech tip at the library's new website.
Come back on Monday, April 23 at 11 AM for the follow up session. Find out the results, ask questions, and hear a bit more about the website.
Come back on Monday, April 23 at 11 AM for the follow up session. Find out the results, ask questions, and hear a bit more about the website.
Sunday, April 8, 2012
Monday, April 2, 2012
Tip 2 (Week 2 Spring 2012) ArticlesPlus Testing
Start your tech tip at the library's new website.
Adobe Connect Session
Come back on Tuesday, April 10 at 11 AM for the follow up session. Find out the results, ask questions, and hear a bit more about the ArticlesPlus.
Adobe Connect Session
Come back on Tuesday, April 10 at 11 AM for the follow up session. Find out the results, ask questions, and hear a bit more about the ArticlesPlus.
Monday, March 26, 2012
Tip 1 (Week 1 Spring 2012) ArticlesPlus Testing
Start your tech tip at the library's new website.
Adobe Connect Session
Come back on Monday, April 2 at 11 AM for the follow up session. Find out the results, ask questions, and hear a bit more about the ArticlesPlus.
Adobe Connect Session
Come back on Monday, April 2 at 11 AM for the follow up session. Find out the results, ask questions, and hear a bit more about the ArticlesPlus.
Thursday, March 8, 2012
Tip 10 (Week 10 Winter 2012): Countering a Meeting Time
Proposing new times for meetings you have been invited to in Outlook is very easy. All you have to do is:
1. Open the meeting request email

2. Then you will see the meeting time in with your calendar.

3. After you see what you have scheduled on your calendar you are able to counter it. If you cannot make the proposed time for the meeting there are two options at your disposal. Click on the button with the orange arrow and says “Propose New Time”.

4. These are your two options:
a. Tentative and Propose New Time: With this option you will accept the meeting and it will put in on your calendar. It will also ask you to propose a new time. You would use this option when you have to meet with a colleague and are able to meet but would rather meet at a different time.
b. Decline and Propose New Time: with this option you will NOT put the meeting in your calendar and it will ask you to propose a new time and date for the meeting. It will send the originator of the meeting a counter request.
5. Once you click on either one of these you a new window will pop up asking you to suggest a new time. You can either select the new meeting time by either moving the green and red lines or you can select a new time by using the dropdown boxes under “Meeting Start” and “Meeting End”.
6. Then all you have to do is click “Propose Time” at the bottom of the screen.

Post Author: Paul Campbell
Wednesday, March 7, 2012
Tip 9 (Week 9 Winter 2012): Sending/Receiving Responses
Outlook gives us the ability to request a response to meeting invitations. And, along those lines it also allows us to not request responses. This is nice if you're sending an invitation to a large group of people and don't want to clutter your email inbox.
The default for any meeting proposal is to request responses and allow new time proposals.


The default for any meeting proposal is to request responses and allow new time proposals.

This will give recipients the ability to not only add the meeting to their calendars, but also respond to the organizer.

If you turn off requesting responses, the recipient when accepting will have the meeting simply added to her calendar, but the response to the organizer will not be available.


Either way the meeting looks the same in the calendar once accepted.

Declining a meeting gives you the same options. However, once declined the meeting will not show up in your calendar.

This is what each acceptance should look like if you request responses to a meeting.

Please note, if you counter meeting request with another time proposal, please do so only if there is a very small number of attendees.
To complete this tip either watch the live or recorded version of the webcast and then encourage your teammates to complete their tasks.
Post Author: Derek Malone
Friday, February 17, 2012
Tip 8 (Week 8 Winter 2012): Scheduling Assistant In Depth
Scheduling Assistant in Outlook: a Few Niceties
-Open a new meeting
-Click on “Scheduling Assistant”

1. You can schedule a pre-set group.
I have e-mail groups for several subsets, for example, Reference. So I can type in the name of the group and then click the + to expand the names.


It will ask you if you really want to do this; you do.

Now you can check for a time when everyone is free. If you were trying to get this group together, you’d be having a hard time….
2. Don’t forget to check the room, too, while you’re at it. I can click on the resources button below this list, find the Alden Rooms, and choose more than one at a time by holding down the shift key.
Slick.

Now I can choose a meeting time and etc., as we have seen in other Tech Tips.
3.

You can make some stipulations when you set your meeting:
-request responses, for example. IF you turn this off, people don’t have to respond to your meeting request. This is useful for an all-staff meeting, maybe, for which you do not need to know how many people plan to come.
-Allow people to suggest a different time for this meeting. I don’t recommend this unless it is a very small group!

The guy that makes the meeting has the power!
5. I like to color-code my meetings. I can do this from this screen, or later, after the meeting is in my calendar.

You can see I’ve already made categories, and all I have to do is click on the categories tab, choose my color, and the meeting shows up in color.
If I want to create new categories, I click on “All categories” and it lets me make a new one.

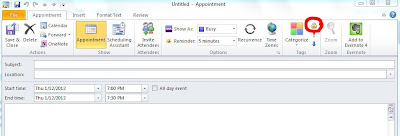
6. I can mark this meeting “private,” so other people can only see the block, not the details. I can mark this meeting “important” and that little icon will be highlighted on the meeting page.
You can check off TT 8 when you have used Scheduling Assistant to make a meeting with more than one person, marked it important, and color-coded it.
Tuesday, February 14, 2012
Tip 7 (Week 7 Winter 2012): Scheduling a Meeting Room & Inviting Multiple Attendees
By now, you’ve probably got the hang of inviting people to meetings. Today we will review that as we learn some other tips about scheduling meetings:
- How to find an available room in the library for a meeting
- Two ways to schedule a meeting in a particular room
FINDING AN AVAILABLE ROOM IN THE LIBRARY FOR A MEETING
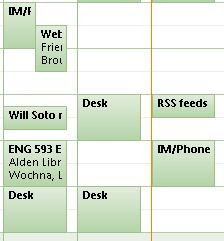
To find which rooms are available, click the “Rooms” arrow in the left sidebar of your calendar.

You can click on as many rooms as you want. Each room’s calendar will open up next to yours.

In the above view, I can easily see that if I wanted to schedule a meeting for Feb. 20th from 10-11, both the Friends Room and the ABC Conference Room are available. I find it easier to do this step before creating a meeting and inviting people, so that I know what room I can use. But you don’t have to do it that way.
SCHEDULING A MEETING IN A PARTICULAR ROOM
There are two ways to schedule a meeting in a particular room. First, click the “New Meeting” icon in the upper left corner of your calendar and set the subject and time for your meeting.
For choosing a room and inviting people, you can use two methods. Method 1 uses the “To” button. Method 2 uses the “Scheduling Assistant” feature.

Method 1: Use the “To” button
Click the “To” button in your meeting. You should see the familiar “Invite Attendees” window. Type “alden library” into the search box (the same place you would type in a person’s name to find them). Choose the room you want, and click the “Resources” button at the bottom.
NOTE: You could just double-click on the room name, but be careful – it may go next to “Required” or “Optional” (for people names) instead of “Resources.”

Now, invite some people as you’ve done in the past by searching for a person’s name, selecting the right person, then clicking either the “Required” or “Optional” button, depending on whether they are required to come to the meeting.
In this case, I have chosen to invite the Library Staff.
Click OK. You will be taken back to the meeting screen, where you can see the room you chose next to “Location.” You should see “Library Staff” and the room you chose next to the “To” box.

If you want to change the meeting location before sending, you can click the “Rooms” button to the far right of the box.
If this were a real meeting, you would then click “Send” to notify those invited to the meeting.

This method works best if you’ve already checked room availability as described at the top of this blog post and you know the room you want is available.
What will happen is that an email will be sent to you that says the room “accepted” or “declined” your meeting, depending on whether or not the room was available.

Method 2: Use the “Scheduling Assistant”
This method shows you the calendars of everyone invited as well as the room you chose, so that you can see if everyone is available (and the room) at the time you want the meeting.
First, start a new meeting. Click the “Scheduling Assistant” icon. A window will open that shows your calendar (in a different format than you may be used to). There are two buttons toward the bottom of the window called “Add Attendees” and “Add Rooms.”

Click Add Attendees and add a few people as you have done before. Note that the names are divided by semi-colons. If you want to delete a name, just back up your cursor or select it and hit the delete button on your keyboard. But be careful to leave a semi-colon between each name.

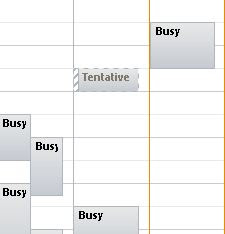
When you click OK, you will see the calendars of all the invitees below yours. If you see that someone has a conflict and can’t meet at that time (in purple) you can either adjust the meeting time by dragging the red and green lines to a new time slot, or you can go to the bottom of the window and change the meeting day/time.

Now that you have a good time for your meeting attendees, click the Add Rooms button, search for “alden library” and choose a room. After clicking OK, you should see that the room has been added to the list. Whether or not it is available will be indicated in purple or shown as open, just as in the attendees’ calendars.

Click the Appointment button at the top of the window. You will be taken back to the window where you can see the attendees and room listed, make any needed adjustments, and send the meeting invitation.

YOU HAVE FINISHED THIS TECH TIP WHEN YOU HAVE:
1. looked at today’s available rooms using the checkboxes in the left sidebar of your calendar.
2. scheduled a meeting room in the library for a specific date and time, and invited more than one person.
Post Author: Diana Nichols
Post Author: Diana Nichols
Friday, February 3, 2012
Tip 6 (Week 6 Winter 2012): Inviting others to an event
Inviting others to meetings using your Outlook calendar is similar to choosing people for email messages. After opening the meeting box, you can enter email addresses in the “To” box, or if you don’t know their address, you can click on the “To” box:

This opens the “Select Attendees” box. The default address book is “Global”--which includes all of Ohio University’s personnel, students and most meeting rooms.

After searching for their name (last name first), please make sure you have the correct person (look for ALDEN LIBRARY in the location). There are at least two Alden employees’ names which look exactly the same in the global address book. See below for Derek Malone—the first one is the famous one from Alden ILL, the second one is an unrelated student.

Another person who has this same scenario is Wei Yan. Again, please make sure to check the location or other identifying factor for the person you are choosing.
You can double click on the person you want to invite, or single click and then click on the “Required” box at the bottom of the “Select Attendees” box. This places their name in the “Required” field.
Then click OK, and their name is now in the “To” field on the meeting. When you have the meeting ready, hit send and the invitees will receive the email inviting them to the meeting.

Note that after their name is entered into the meeting box, you can scroll over their name and see some information about them. This is also an option for many of Outlook’s windows.
In order to complete this tip, create a meeting and invite some people, making sure to look at Derek’s and Wei’s names in the global address book. Then mark the checklist.
Post Author: Jo Brown
Friday, January 27, 2012
Tip 5 (Week 5 Winter 2012): Scheduling a meeting, vacation, and repeats
There are three easy ways to schedule a new meeting in your calendar. First, find the time and date that you want to schedule the meeting. Then, either double click the cell, right click and choose " New Meeting Request," or click and choose "New Meeting" at the top of the screen.


Below is the next screen you'll receive where you'll enter the information for the new meeting. Subject and Location are both preferred by Outlook and it will remind you should either of these field be missing. At the top of the screen you'll be able to show yourself as free or busy during that time, and choose how you'd like to be reminded.

This is also where you can setup a repeating meeting.

Here you're able to choose the days of the week you'd like to repeat, an end date, or an amount of weeks you'd like the meeting to continue.

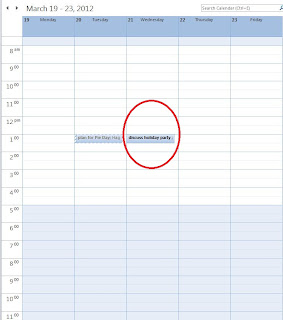
Lastly, it's preferred that vacations be marked in calendars by the full hours to work that day. In the example below you'll notice a blocked off 8-5 with the subject of "vacation." Also, the time is shown as busy. This should be done for all vacation days.

To complete this task setup a recurring event, or schedule your next day of vacation.
Post Author: Derek Malone & Steve Mowrey
Tip 4 (Week 4 Winter 2012): Calendar Preferences
This post is intended to give a brief overview of some good practices when it comes to calendar preferences. To have a good view of what your week will consist of, it's probably best to setup your calendar to show your work week.


This view shows Monday-Friday, 8-5 by default, but should you work different hours that can be changed. By clicking the small arrow in the bottom right corner of the "Arrange" box you're able to open options for your calendar and manipulate them to your liking.

You can change your work week hours here, days, etc. Unfortunately, it can't be done on a daily basis (i.e. Tuesday 10-7, Wed 8-5, etc.). But, if you do have differing hours, maybe you could setup 8-7 in that example as your work week.
This box also gives some options for meetings.

You can choose different times for your reminders instead of the default 15 minutes prior, change whether attendees can propose new times to your meetings, and toggle with your free/busy options.
To complete this Tech Tip visit your calendar options and set your work week as you'd like it. Make sure to check yourself off the list when finished.
Post Authors: Derek Malone & Terri Nelson
Monday, January 16, 2012
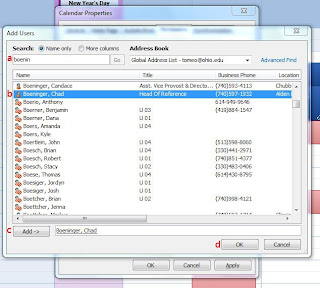
Tip 3 (Week 3 Winter 2012): Calendar Permissions
Anyone at Ohio University on Outlook (Exchange server) can view your calender. Don’t panic. They can only see if you are free or busy (not any details about what you are doing or where you might be) because they are viewing your calendar as one of the preloaded users (either default or anonymous). It can be beneficial for certain people (like your supervisor or your colleagues in your department) to see more detailed information about your schedule. You can control the information others see about your appointments and meetings by setting the permission level for the contact (i.e., library staff) and by making appointments and meetings private.
Part A: Adding contacts to your calendar permissions
Let’s start by adding library staff to “calendar permissions” so you can adjust their permission levels (it has been highly recommended that all supervisors have “reviewer” level access to their staff’s calendar).
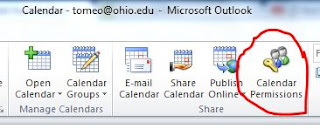
Starting from the calendar view in your Outlook:
Now that everyone is in our list, let’s see how to adjust permission levels for one or more contacts.
Part B: Adjusting the permission level of your contacts
Let’s learn a little about the different permission levels. A warning, never assign anyone the permission level of “owner” as they will have access to everything and can cause havoc.
As already mentioned the two preloaded user types, default and anonymous, have a “free/busy time” permission level. When a default or anonymous user, or a person you set to this permission level views your calendar, they see that you are either free or busy.
If you adjust the permission level to “free/busy time, subject, location” or “reviewer”, the viewer will see if you are free or busy as well as the details i.e., the subject and location of your appointments and meetings.
There are several more permission levels (contributor, author, editor, and the variations of author and editor). These are beyond the scope of this post because these permission levels give the contact varying ability to create, edit, and/or delete appointments and meetings. Most everyone in the library will just need to be able to read your calendar.
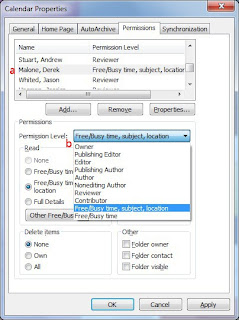
To adjust the permission level:
Part C: Making appointments and meetings private
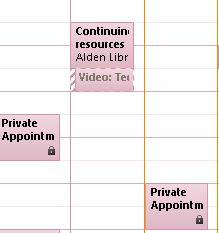
For certain appointments (e.g., doctor’s appointment), you may want everyone, regardless of their permission level, to see that you are busy and nothing else (indicated on your calendar as "private appointment").
To make a meeting or appointment private:
You can mark the tech tip complete on the Google spreadsheet after you
Part A: Adding contacts to your calendar permissions
Let’s start by adding library staff to “calendar permissions” so you can adjust their permission levels (it has been highly recommended that all supervisors have “reviewer” level access to their staff’s calendar).
Starting from the calendar view in your Outlook:
- Click “Calendar Permissions”
- Click “Add...”
- Search for the last name of a library staff member (a)
- If the name is not already highlighted in blue, click on the name to highlight it (b)
- Click “Add->” (c)
- Repeat steps 3 to 5 for each staff member you would like to adjust their permission levels
- Click “Ok” (d)

Now that everyone is in our list, let’s see how to adjust permission levels for one or more contacts.
Part B: Adjusting the permission level of your contacts
Let’s learn a little about the different permission levels. A warning, never assign anyone the permission level of “owner” as they will have access to everything and can cause havoc.
As already mentioned the two preloaded user types, default and anonymous, have a “free/busy time” permission level. When a default or anonymous user, or a person you set to this permission level views your calendar, they see that you are either free or busy.
If you adjust the permission level to “free/busy time, subject, location” or “reviewer”, the viewer will see if you are free or busy as well as the details i.e., the subject and location of your appointments and meetings.
There are several more permission levels (contributor, author, editor, and the variations of author and editor). These are beyond the scope of this post because these permission levels give the contact varying ability to create, edit, and/or delete appointments and meetings. Most everyone in the library will just need to be able to read your calendar.
To adjust the permission level:
- Select one contact or multiple contacts by using CTRL or Shift (they will be highlighted in blue) (a)
- Select the permission level from the pull down menu (b)
- Click “Ok”
Part C: Making appointments and meetings private
For certain appointments (e.g., doctor’s appointment), you may want everyone, regardless of their permission level, to see that you are busy and nothing else (indicated on your calendar as "private appointment").
To make a meeting or appointment private:
- Create the meeting or appointment
- Click the lock icon
You can mark the tech tip complete on the Google spreadsheet after you
- added a library staff member (your supervisor, for example) to calendar permissions,
- changed the permission level for contact(s), and
- created a private appointment or meeting.
Post Author: Megan Tomeo
Subscribe to:
Comments (Atom)