Friday, September 30, 2011

Tip 4 (Week 4 Fall 2011): Using the New Microform Scanners


MICRO/SCANNER INSTRUCTIONS
 FOR GETTING STARTED

1.      Logon to computer.

For OU students and staff use: Ohio ID
For guests use: “library” and “guest1”
2.      On the screen, double click the Red Icon    
 

for PowerScan2000.
3.     When the program opens, select the image for your film type. (35mm film, microfiche, etc.)

4.      Slide the black tray toward yourself until the glass pops up. (Be sure glass is centered on the carrier.)
5. For microfilm, follow diagram on the computer screen to thread film.


Advance film using the “control box” (also on screen).

6.      Most adjustments are available under the tabs labeled “home” and “adjust” (on left side of screen)


7.      For specific instructions on each button see laminated “Quick Start” guide near the scanner.
8.      When finished, rewind film on original reel and place on gray shelves under the blue sign that says, “Return Microforms Here”.
9.      Close ScanPro program and log off computer.

If you need additional assistance, please, inquire at the service desk on this floor.

Instructions to:
Scan, save & print

1.      To create a file to print or attach to an email use this button located under the “home” tab.

2.      The scanned image will be whatever is contained inside the dotted green box on the screen.

3.      The following pop-up box will appear.
4.      If you wish to scan more images, close the box by clicking on the “X” and continue.
5.      If you are finished scanning, click on the “finish” button inside the box.
6.      To locate the file, open “My Computer” from the desktop.
7.      Open “New Volume (D:)” and locate the scan with the most recent date and time. You may now name the file; attach to email; or open it to print. 


To complete this task - visit the 1st floor - scan a micro - and save it to the D drive.  If you need any assistance, please inquire at the service desk.

Post Author: Edie Luce

Tuesday, September 20, 2011

Tip 3 (Week 3 Fall 2011): Libstats 101

Hello Alden!   This week we are going to learn about LibStats.  What is it?  Libstats is a data collection program that we use to collect data on the questions that are asked by our patrons.  Some wonder why we need to take down every question.  I know that it can be tedious when you have a line of people waiting to ask questions at the service desk, but keep in mind that LibStats is how we are able to tell how many questions are being asked of us, when they are being asked and from what method they are being asked. 

For example, the Reference department needed to decide how many librarians to staff the desk during the evening hours for the fall quarter.  So the department consulted LibStats to figure out how many questions were being asked at the desk between 5:00 pm and 10:00 pm.  Turns out they were able to shift things around a bit so now the librarians only have to stay until 9:00 pm instead of 10:00 pm. 

I would like you to go to a service desk and take a look at the program.   What you will see is something like this at the top of the page.  (Keep in mind that every desk is going to have something just a little different in regard to the categories available.)


You would now just select the proper location of where you answered the question, the question type, how long it took you to answer the question, what format did the question arrive at you, then your initials. 

The question box is to type the question that you answered.  If you are using instant messaging, email, or texting you can just copy and paste the question into the box.  Finally you can click “Save Question/Answer”.  Once you click “Save” you question and answer will be recorded and will look like this: 


There are often questions that really do not need an answer every time they are asked.  “Where are the bathrooms?” or “May I use a stapler?” do not really need to have answers.  However, the question does need to be recorded in LibStats.  I only put anything in the answer box when I get a question that I do not know the answer to or the questions that I feel the rest of the desk staff might have some benefit from having the answer. 

This is LibStats in a nutshell.  So, please go to a service desk where they have LibStats up and use the program a bit.   


Post Author: Paul Campbell

Monday, September 12, 2011

Tip 2 (Week 2 Fall 2011): Evernote - capture your thoughts everywhere

Evernote may be the digital notebook for you. Have you ever...
  • wanted to take notes on your mobile device?
  • wanted a better way to organize your information?
  • capture a page form the web (requires the add-on web clipper), add your thoughts with some text notes, and save an email from Outlook all in one place (requires installing the application on your computer)?
Access Evernote from the web, your desktop, or your mobile device (and because it is web-based all your notes stay synced without any effort on your part).

Getting Started
First let's create your account,
  1. Point your browser to http://www.evernote.com
  2. Click "Create Account" (upper right)
  3. Fill out the form and click "Register"
  4. Sign into Evernote with your newly created account


Creating your first notebook
Everyone has a notebook (think of a notebook as a file folder) called username's notebook so for me it is mtomeo's notebook. If you do not select a notebook, notes will be saved in this notebook by default.
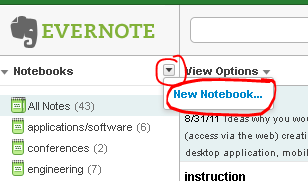
  1. Click the down arrow to the right of Notebooks (upper left) then click "New Notebook..."
  2. Enter a name for your new notebook and click "Save"


Creating your first note
  1. Select the notebook you want the note to be save in (not to worry if you save it the wrong notebook, they can be moved)
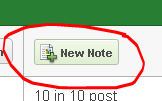
  2. Click "New Note" (upper middle)
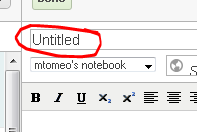
  3. Give your new note a name in the text box called "Untitled"
  4. Start entering text, grabbing web pages, inserting images, etc.


This is just the tip of the iceberg. With Evernote, you can create to do list(s), share notes with colleagues, add apps to enhance functionality, and easily find it when you need it.

Remember once you have created your notebook and your first note to put an 'x' in the Google spreadsheet. Good job!

PS If you are curious how intense Evernote can get, check out this blog post. Thank you to Tim for the link.

Post Author: Megan Tomeo

Wednesday, September 7, 2011

Tip 1 (Week 1 Fall 2011): Things to do without internet access or without a computer

THINGS TO DO WITHOUT INTERNET ACCESS OR WITHOUT A COMPUTER:
THE FIRST THING YOU MAY WANT TO DO IS TO COPY/PASTE ANY TIPS WHICH YOU LIKE INTO A WORD DOCUMENT AND PRINT IT. THAT WAY YOU WILL HAVE IT IF YOUR PC IS DOWN. YOU CAN ALSO ADD THE WORD DOCUMENT TO YOUR HOME STORAGE.

IF PC IS WORKING, BUT INTERNET IS NOT:
IF YOU HAVE ACCESS TO EMAIL, CLEAN IT UP. DELETE ANY UNWANTED EMAILS FROM YOUR INBOX AND SENT MAIL OR MOVE THEM INTO A FOLDER. BY SAVING THEM IN A FOLDER, YOU CAN STILL ACCESS THEM WITHOUT USING THE LIMITED STORAGE SPACE IN YOUR INBOX, SENT MAIL AND DELETED ITEMS.
TO CREATE A FOLDER IN EMAIL (OUTLOOK), GO TO THE FOLDER TAB (RED CIRCLE BELOW), CLICK THE "NEW FOLDER" ICON:


NAME YOUR FOLDER (FIRST RED CIRCLE BELOW),

DECIDE WHICH ITEMS YOU WANT FOR THIS FOLDER – USUALLY “MAIL AND POST ITEMS” (SECOND RED CIRCLE BELOW),

AND SELECT WHERE YOU WOULD LIKE TO STORE THIS FOLDER – I HAVE SELECTED “INBOX” (THIRD RED CIRCLE BELOW).


TO PLACE EMAILS IN YOUR FOLDER(S), SIMPLY SELECT (HIGHLIGHT) THE EMAIL  AND CLICK ON “MOVE” (FIRST RED CIRCLE BELOW).  YOU WILL NEED TO BE IN THE “HOME” TAB TO MOVE EMAILS. YOUR LIST OF AVAILABLE FOLDERS WILL APPEAR AND CLICKING ON THE APPROPRIATE ONE PLACES THE EMAIL IN THAT FOLDER.

YOU CAN ALSO DECLARE RULES SO THAT CERTAIN EMAILS AUTOMATICALLY ARE PLACED IN CERTAIN FOLDERS (SECOND RED CIRCLE BELOW).


TO ACCESS YOUR FOLDER(S), SIMPLY CLICK ON IT FROM THE LEFT HAND MENU, AS CIRCLED BELOW:


IF PC IS NOT WORKING
  • SHELVE BOOKS – TALK TO JOYCE OR LUCY.
  • SEND AN OLD-FASHIONED THANK YOU NOTE TO SOMEONE WHO DID SOMETHINGS FOR YOU.
  • MAKE A LIST OF THINGS YOU NEED TO DO WHEN YOU HAVE COMPUTER ACCESS.
  • CLEAN YOUR DESK (TOP, DRAWERS, SHELVES, KEYBOARD, ETC.)—GO THROUGH PAPERS/BOOKS AND DECIDE TO KEEP OR RECYCLE.
  • CLEAN PART OF THE STAFF LOUNGE (REFRIGERATORS, FREEZER, COUNTERTOPS, MICROWAVES, ETC.)—PERHAPS GET OTHERS IN YOUR AREA TO WORK WITH YOU
  •  WRITE DOWN ALL OF YOUR PASSWORDS, ACCESS CODES AND OTHER SENSITIVE INFORMATION. DIVIDE THE LISTS OF INFORMATION INTO CATEGORIES FOR YOUR FAMILY, BOSS, ETC., AND KEEP IN A SAFE PLACE. OR, WHEN YOU HAVE INTERNET ACCESS AGAIN, YOU CAN USE A PASSWORD MANAGER (THERE ARE FREE/PAY-TO-USE SITES).


COMPLETE THIS TECH TIP BY CREATING A FOLDER FOR EMAILS AND MOVING SOME ITEMS INTO IT, AND THEN MARKING NUMBER ONE BY YOUR NAME ON THE CHECKLIST.


Post Author: Jo Brown